Helen's Garden Renovation Project

Friday 7 November 2008

The plastic shed

Filed under: Pelargoniums,Progress — Helen @ 5:58 pm

This week I assembled the plastic ‘sentry shed’.

The plastic shed next to the wooden shed

The plastic shed next to the wooden shed

Overall I am pleased with it and I think it was a good decision to buy it. For the benefit of any other plastic shed buyers out there, here are my comments:

(1) The instructions were so bad it was almost frightening. There were no words – just pictures. The pictures were actually very well drawn, but there needed to be some words. For example, the very first picture showed a hand holding a small rectangle next to a rectangle-shaped hole. It didn’t say which part had the rectangle-shaped hole in it, and it didn’t say whether all the holes had to be filled with small rectangles or just some of them. Realising that it would be impossible to get the rectangles out of the holes after snapping them in, I wondered what the holes were for and whether some of them should be kept open so that something else could be slotted into them. Afterwards I came to the conclusion that the holes were probably an artefact of the manufacturing process, but this is the sort of thing the instructions should have said.

(2) Putting the pieces together was mostly easy, but I was worried that I might connect the wrong parts and be unable to pull them apart afterwards.

(3) Some pieces snapped together very easily, but others required considerable force to make them click home. This was difficult to achieve because if you whack plastic with a hammer it is likely to split. I found the best technique was to hang onto the top of the shed and gradually apply as much as my bodyweight as necessary to push the pieces into place. I suggest that anyone weighing less than 65kg should probably eat a few cakes before attempting to assemble this shed.

(4) The construction of the shed seems to be sturdy and the shelves are well supported.

(5) I think it took me about three hours to assemble the shed, but I took my time because I didn’t want to risk doing anything wrong that couldn’t be undone. If I had to assemble a second one, I think I could do it in well under an hour. One person can do it alone, but you may need a stepladder.

(6) One disadvantage of the shed, for me, is that the space for storing tools is not very high. I cannot get my lawn rake into either shed, which is a shame. Also there is not very much space allocated to storing tools.

(7) The other disadvantage of a plastic shed as opposed to a wooden shed is that it is harder to fix hooks to it to hang things on. I may be able to use self-adhesive hooks, though. And as I said, there isn’t much hanging space anyway.

The interior of the plastic shed

The interior of the plastic shed

The next thing to do is to buy a padlock for the shed, and then I will have to put things in both my sheds to make room for the greenhouse. I need to think about what will go in the sheds, but for now I will just put in as much as I can so there is plenty of room in the garage.

Other reports: The very badly taken pelargonium cuttings are cheerfully getting on with producing some very badly grown roots and show no signs of getting very bad rot. I haven’t seen the cats in my garden, but I also haven’t seen them anywhere outside, so maybe it is too cold for them and they are doing their business in their litter trays indoors. I do hope so.

\

Thursday 30 October 2008

Snow in October?

Filed under: Uncategorized — Helen @ 11:54 am

I couldn’t quite believe it when I opened my curtains yesterday morning and saw how much white there was around. The snow had only settled on the grass and soil, not the paths or roads, but it was still an impressive effort for the time of year. I unwisely cycled to work, but did not fall off.

The day before yesterday I tried to persuade Wilkinson’s to give me a discount on a half-dead plant. It was a skimmia rubella, priced at £5.99. I am after a skimmia for my side border, in the dark next to the pulmonaria. I would prefer a female one, as I think the two male skimmia “Kew Green” planted in our residents’ landscaping would enjoy having a lady living across the road from them, but the male rubella is a good plant. For some reason, skimmias seem to be quite expensive, even for small plants, and had the plant been healthy, it would have been a bargain. But two stems were completely brown down to soil level and the soil was bone dry. I reckoned it had less than a 50% chance of survival (so slightly more than half dead) but for a couple of quid I was willing to take a chance. However, the best Wilkinson’s could offer me was 10% off, and I wasn’t taking those kind of odds. They’ve probably thrown the plant away now. Don’t they know there’s a recession on?

On the plus side, my plastic shed arrived this morning, and I have stowed it away in the garage until the weather gets warm enough for me to assemble it without dropping all the bits because my fingers are too numb to hold anything. I ordered it exactly a week ago, so well done to the Original Gift Company (aka Scotts of Stow).

\

Friday 24 October 2008

Shed progress

Filed under: Uncategorized — Helen @ 3:31 pm

I’ve had a cold and have been having a rest from gardening, although I did some tidying up yesterday. However, I have made some progress in that I have bought a second shed. I needed a tall one to go next to the short, fat, wide one, so I can put rakes and spades in it. A catalogue from “The Original Gift Company” came through my door, and when glancing through it before putting it into the recycling bin, I saw the perfect shed, called a ‘Sentry Shed’. It’s made of plastic, so doesn’t require drills and saws to put it together, and of course it won’t need painting. I had always assumed that gift catalogues contained entirely things that you would give to someone else but wouldn’t want yourself, but apparently not. Also it shows that junk mails works. Drat.

\

Thursday 16 October 2008

The boring stuff

Filed under: Pelargoniums,Progress — Helen @ 5:54 pm

Now that my hedge is underway, I am planning to spend a couple of weeks doing boring things like weeding the right-hand side border, tidying up the leylandii logs, and clearing up dead leaves, in between gawping at the stock market indices with horrified fascination. Then it will be time to start digging the trench for the cable.

I have been having some trouble with cats treating the area around the hedge as their toilet. My neighbour (not the one who owns the cats) suggested a product called “Get Off”, which consists of very smelly green crystals. He has been using it himself, which is possibly why the cats have chosen my garden for doing their business in. So I went down to Wilkinson to get some (£2.99 for 40 square metres’ worth). I decided to treat the cats’ favourite entrance route first and see if that puts them off, so I scattered the crystals on my new border along the fence and up to where I have planted the half-hardy annuals. If I can stop them coming into the garden in the first place then I won’t have to treat the whole area. As I weeded the other end of the garden, I could smell the crystals very strongly. I may have overdone the rate of application. I think I need to put the bottle in the garage, not in my living room, now I have opened the seal. That’s not to say it smells unpleasant – it’s just very strong.

The very badly taken pelargonium cuttings are looking well, and are flowering on their incorrectly chosen flowering stems.

\

Friday 10 October 2008

Installing the thuja

Filed under: Conifers,Pelargoniums,Progress — Helen @ 4:35 pm

After the heavy rain on Sunday and Tuesday, we have had another gorgeous warm October day, which seems all wrong given that the world is going through the biggest crisis that many of us have ever known. Last time we had a really big stock market crash, in 1987, loads of trees blew down at about the same time. I am hoping that there won’t be a repeat of that because I have put a lot of hard work into planting these thuja.

First lot of thuja planted

First lot of thuja planted

When I calculated how many thuja I would need, I decided that I needed the same number as the leylandii (10) plus two extra to make the hedge a bit longer, and therefore I bought 14, to include two spares. However, what I forgot to check was the spacing of my leylandii. I planted them (correctly) 2.5 feet apart, but thuja want to be 2 feet apart. So my four leylandii really needed to be replaced by five thuja. Actually, I decided to only plant four at this time because the fifth one might struggle a bit, being very close to a well-established leylandii, but it looks like I will need all 14 of my thuja. I just hope that they perform better than my HBOS shares.

I used my final bag of organic compost in planting the thuja. I put some in the planting hole, and spread the rest around the area, making sure that it didn’t touch any of the plants. My neighbour said that when she used the same compost, she got a load of mushrooms, even though it was May. If I get a good crop, I will take some photos.

My very badly taken pelargonium cuttings haven’t died yet.

\

Saturday 4 October 2008

In a hole

Filed under: Conifers,Progress — Helen @ 3:49 pm

I have lost count of how long I have spent digging this hole, but I have put in a stint every day that I haven’t been out doing my NHS job for the past two weeks, because it just hasn’t rained except when I have been working at the NHS. I think I have done about ten sessions. At 400 calories an hour, and about one and a half hours per session, that comes to about 6000 calories. The cake was 4000 calories, and I’ve eaten about 90% of it, so the project was funded by 2400 calories from my internal reserves. That equates to about 2/3 lb of fat. So here is a picture of me looking pleased about the hole, but not discernibly thinner.

Me in conifer hole

Me in conifer hole

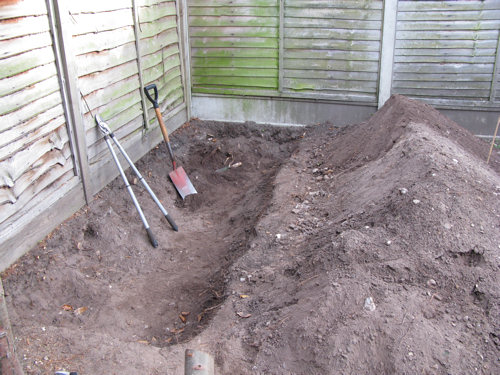
My back started to give me a few twinges last night, but this morning was forecast to be fine, while tomorrow there is a weather warning for huge amounts of rain. So I took some ibuprofen and finished the job. Here is a picture of the hole without me in it. I hadn’t quite finished digging when I took the photograph – there were a few roots to be dug out at the far end – but I took the photograph because I needed a rest.

Hole dug for new conifers

Hole dug for new conifers

After that I tipped in one and a half bags of organic compost from The Compost Centre, tipped in some more soil, and put in another bag of compost. The compost is certainly organic. It was also very wet and slimy because I had left the bags outside for six months and they had ventilation holes punched in them so the water got in. I tipped in some more soil and decided that was enough for now. It is quite an easy job filling the hole in again, partly because I’m moving the soil downwards from the heap to the hole so am not working against gravity. However, I did find myself getting quite warm with the work, which is just as well because the temperature is getting very much more autumnal now.

In between all this manual labour, I have been doing some thinking about the hedge. My little thuja plants are about 3 ft tall, which is half the height of the fence. If they grow at a rate of 2 ft a year, which I think is a reasonable estimate, it will take them four and a half years to get to be 12 ft, and probably a few more years to get nice and bushy so they form a proper screen. If I replace the rest of the hedge in two phases, one part next autumn and the final part the autumn after, I will then be going for two to three years with hardly any screening from the hedge. But if I leave the Leylandii in place for longer than two years, the trees will grow that much bigger and may be too big for me to remove safely myself, and the thuja will be bigger and more difficult to plant too. I may compromise by removing the left-hand end of the hedge next autumn, but waiting a little longer before removing the middle.

\

Sunday 28 September 2008

Excavations

Filed under: Conifers,Pelargoniums,Progress — Helen @ 3:13 pm

The past two weeks have been exceptionally fine and sunny, with hardly any rain. I have had six stints at the conifer excavation site, each lasting about one and a half hours, and after all this work I have removed two of the trunks. After cutting through the biggest roots, I pushed the tree over in several directions until the rest of the roots snapped or were exposed enough for me to see them and snip through them.

Removal of first conifer

Removal of first conifer

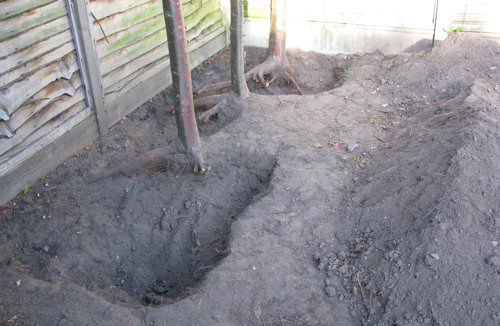
It is then necessary to dig a bit deeper to remove the snapped off roots to enough depth to give the new resident of the hole plenty of room to grow. Well, probably it is. I’m not taking any chances, as I do not intend to be replacing the next lot of conifers.

Roots exposed after Saturday\'s stint of digging

Roots exposed after Saturday's stint of digging

I took the two photographs above yesterday, but this morning I made some more progress. I dug up the conifer next to the one I took out on Saturday. This involved sawing through one root with my lovely chipboard saw, which was a Christmas present from my parents in 1987. I did not use the scary Alligator because it was only about nine o’clock on Sunday morning and I thought it might be a bit noisy, and I didn’t want to get mud in its teeth from the dirty root, not because I was too scared of it. It’s a perfectly safe tool if used sensibly.

I have given the potted plants their third dose of Wilkinson’s Wonder Gro, so that should keep them quiet until March. I think I will have to give them some more Vine Weevil killer too as it is only supposed to last for four months. Perhaps I can do that on Monday, which is forecast to be another fine day. It will make a change from digging.

On Friday I took some cuttings of my pelargoniums very badly. According to Gardeners’ World shown that very evening, I should use a knife sharp enough to dig into my thumbnail, choose non-flowering stems, and put the cuttings round the edge of a pot, using compost with bits of grit in it. Instead, I snapped the cuttings off without using any weapons, not caring about whether the break was particularly near a nodule in the stem or not, pulled off the lower leaves, and put them in B&Q stem and cutting compost, on special offer last spring. I put each one in a separate pot. Out of my seven cuttings, six were flowering or in bud. I have put them on a sunny, cold windowsill. (The windowsill is cold because it is in a room I hardly ever heat, and it’s now cold enough to need heating in the mornings and evenings). Let’s see what happens. My hypothesis is that taking pelargonium cuttings is so easy that even if you do it very badly, they will succeed. If I am wrong, and I don’t realise they are dead until the frost kills the pelargoniums outside, it doesn’t matter because I have a plant growing indoors and can take some cuttings off that in the proper manner. I will, of course, report the outcome honestly in this blog.

Very badly taken pelargonium cuttings

Very badly taken pelargonium cuttings

\

Sunday 21 September 2008

A day for hedging

Filed under: Conifers,Progress — Helen @ 8:58 pm

On Monday I was just outside chatting to a neighbour when I managed to flag down a passing tree surgeon and got him to quote for shortening the Leylandii trunks and trimming the hedges. He also said how about trimming the silver birch, and I said wouldn’t the pond be in the way, and he said no, so I said do the silver birch as well.

(It is, of course, sometimes a bad idea to have work done on the house or garden by someone who just happens to be passing. However, I have had this tree surgeon’s leaflet through my door a few times over several years. Anyone who has been in business as a tree surgeon for several years is probably competent, for obvious reasons).

So on Friday, as the FTSE-100 soared to its biggest one-day percentage rise since it was invented, and short-selling was banned on financial shares, I handed over the entire contents of my hedge fund to the tree surgeon, and the sun shone brightly all day. I think he did a good job, although I don’t think he trimmed the hedges as neatly as my usual tree surgeon. However, it was a good price, the hedges look miles better than they did before, and most importantly, he happened to be there when I needed the job done. He trimmed my Leylandii trunks to about 3 ft high. I would have preferred them to be a little longer (I asked him to do 4-5 ft) so I could have more leverage, but I think I will be able to manage fine.

Leylandii trunks cut down to about 3 feet

Leylandii trunks cut down to about 3 feet

I may be taking a short position on my beautiful Lawsonian Cypress ‘Pelts Blue’ in the corner next spring, but that’s only to make it more bushy, not because I can’t afford a stake for it and want to get the government to prop it up for me. OK, enough of the hedging jokes.

This morning the sun was still shining for some reason, and I started digging the Leylandii up. I started in the corner, because this one is the biggest tree and the hardest to get at, so I thought I would do it first and then the others will seem much easier. My technique for digging up trees is to dig a big hole around them and trim away any small roots, just leaving the big ones. Then I can cut through the big roots and push the tree over.

Leylandii with roots exposed

Leylandii with roots exposed

Just getting to the stage shown in the photograph was a lot of work. I think it may have taken as much as an hour and a half. At this point I realised that the whole task was going to cost thousands of calories, so I went in for a cup of tea and baked myself a cake.

\

Friday 12 September 2008

Feeding the shredder

Filed under: Conifers,Magnolia,Progress — Helen @ 5:04 pm

This morning I chopped off all the branches of the four Leylandii trees that I am replacing, apart from the ones right at the very top which I couldn’t reach.

The four Leylandii trees after I had removed almost all their branches

The four Leylandii trees after I had removed almost all their branches

It was quite an easy job removing them. Most of them were thin enough to come off with my telescopic loppers, and I sawed through the rest using a hand saw. I didn’t use my Alligator Loppers because I want to practise a bit more before disobeying the instructions not to use them while standing on a ladder. The thing to do is to look up while you are cutting off the branch several feet above your head, and then look down, so the branch falls on the back of your head and neck rather than on your face. In fact, because the hedge is so thick and tangled, falling branches did not gather a lot of speed and therefore it wasn’t painful having them land on me. As Leylandii branches bring me out in a rash on contact it was a good thing not to have them touching my face.

When renewing a hedge on a boundary, it is a good idea to notify your neighbours first. If they like the hedge, they will be disappointed when they see it go, and if they don’t like it, they will be disappointed when the new one starts growing. Although it is a supposedly well-known fact that everyone hates Leylandii, my neighbours like the hedge for the same reason that I do – it gives them privacy. So I have warned them about what I am doing and therefore I hope they did not get too much of a shock seeing bits of my garden for the first time (the hedge was there when they moved in). I think I did quite well to drop only one branch into their garden – I retrieved it with a rake, so that my shredder will not be deprived.

I now need to decide whether I am going to remove the poles myself or get a tree surgeon to do the job. Although they look quite thin in the photograph, they are at least the size of an upper arm, and it can be quite hard work sawing through something of this size when it is vertical. It will also be a fair amount of work digging the stumps out, but I think I can manage this as long as I take my time about it. While I think about this, the next job is to shred all the remains. Stripping the trees took me about one and a half hours. I expect the shredding to take at least that.

The magnolia’s leaves are going brown. I hope this is because it thinks it is autumn, and not because it thinks it’s fed up with being in a pot. I did give it some plant food granules last week.

\

Monday 8 September 2008

My new toys

Filed under: Uncategorized — Helen @ 7:41 pm

I decided to spend some of last year’s tutoring income on some new power tools. I decided that after keeping my patient boyfriend’s shredder for about a year, it was time I gave it back and bought my own. I bought a Bosch AXT 2200 HP Silent Garden Shredder. The picture on the box showed it eating a large shrub, so I decided to decorate mine with some Leylandii for this photograph.

Bosch 2200 HP Silent Garden Shredder

Bosch 2200 HP Silent Garden Shredder

After a successful shredding session I feel able to make the following observations

(1) It is not silent but it is very quiet and peaceful sounding, until you give it a thick branch, when it sings a bit until it’s got through it.

(2) It’s best not to give it a whole shrub in one go, despite the picture on the box. The reason is that the shredding is done by a wheel with spiky bits on it, and you need to shove the branch through the right-hand side of the slot, which is the side that has the wheel edge going downwards. If you try and put it through the left-hand side of the slot, the wheel will just push it back out at you. If you trim off all the side branches to the right of the main stem and shove the stem in, it won’t get pushed to the left by the side branches and therefore it goes down much more easily.

(3) The shredder comes with a bag to collect the chippings, but I haven’t tried this because I have a handy blue cuboid bucket (see photo) which is just the right size. It takes very little time to fill it.

(4) If you want to use an extension lead, it needs to be able to take at least 10A.

(5) It doesn’t shred things into very tiny lumps, but for my purposes, it’s fine.

The shredder was very expensive (£250 from Amazon) but as I reckon I have forty years at least of gardening life still in me, it will be worth the money. Buying cheap shredders just leads to annoyance when things get stuck in them.

Next, I got out my Black and Decker GK1000 Alligator Loppers. This tool is basically a safe chainsaw, but it is still a chainsaw, and to me it looks scary. Note fearful grin in photograph, despite wearing safety equipment and, even safer, not plugging it in.

Alligator Loppers

Alligator Loppers

I bought the loppers from Carl F because they had a really good price for them. When I enquired about the type of power supply, Carl F emailed back to me to say that they were battery powered, with two batteries, an intelligent one hour charger, a battery level indicator and a kit box. Wow, that sounds good, I thought. But when I got the loppers, I found that they just had an ordinary power lead. This doesn’t actually matter because batteries have their disadvantages – you have to remember to charge them up, and they can make the tool heavy. And I have an extension lead. So I decided not to send them back. But I do wonder what the wonderful tool is that has these two batteries and all the other good stuff.

I had some convenient silver birch logs that I thought I’d practise on, so I oiled the machine, pinged the chain a bit to see if it was set correctly (no idea, but the chaps in the factory probably put it on right), turned them on, waited a bit to make sure the chain was running at full speed as per instructions, and then clamped its jaws around a log. I liked the way that it wasn’t very noisy, not like a tree surgeon’s chainsaw. And it sliced through the log in no time. I mean, it was probably about two seconds maximum. But what I didn’t like was that the log jumped about at the start, and it wasn’t a clean cut.

Mess left by alligator loppers

Mess left by alligator loppers

If I had been pruning a tree that I wanted to keep alive, I would have had to get an ordinary saw out to make another, smoother cut. I am not sure whether this jumping effect was because the log wasn’t attached to anything. Maybe if I cut off a branch that was still attached to a tree it wouldn’t move. Reassuringly, the tool didn’t jump around – it is light, and the handgrips are easy to grip firmly. I don’t know whether there is something I am doing wrong, or whether this tool just doesn’t cut cleanly. And also the instructions say you are not allowed to go up a ladder and use the loppers. I wish I knew whether this is proper health and safety advice, like don’t try to take the chain off when the tool is plugged in, or bogus health and safety advice, like the label on our bottle of surgical spirit at work which warns that it could be harmful if you get any on your skin, despite the fact that one of the intended uses of the stuff is to dab it on your skin to harden it.

\
« Previous PageNext Page »