Helen's Garden Renovation Project

Thursday 29 September 2011

Tackling the pond disaster

Filed under: Pond — Helen @ 8:10 pm

The exceptionally fine and dry weather has been continuing, and I suddenly decided it was time to stop looking despairingly at my raised pond and do something about it. I removed the tarpaulin and all its supports, and bailed out the few inches of water at the bottom. Then I got a stiff brush and some water, and scrubbed away at the failed pond paint and the algae, and I sanded the bits I couldn’t reach with the brush, and I kept going until I decided that all the paint that wanted to come off probably had come off. Then I gave the inside of the pond a wash with a damp cloth (the washing water came away dark grey, so the colour was still coming off) and let it dry.

I had to decide what to do about the cracked render at the bottom of the pond. The pond builder seemed to think that removing all the render at the bottom was a bad idea, but I don’t know why. Perhaps he thought I might puncture the liner with my chisel. I decided to pick off all the bits that had come loose, and paint over the hairline cracks.

The pond before repainting, showing the cracks in the bottom

The pond before repainting, showing the cracks in the bottom

I wanted to use V8 Pondseal with a black additive to make the inside of the pond uniformly black, but I couldn’t find anywhere, even on the Internet, that was selling the black additive, so I think it’s been discontinued. There are black paints available that are probably suitable for recoating concrete that has already been painted, or partly painted, but I decided that I wanted to get the pond up and running now instead of waiting until I could get hold of some black paint. I knew that the pond would have dried out quite well in the warm and dry weather, and now was a good time to block any more moisture from getting into the concrete blocks that have been used to build up the shelf inside the pond. Later on, when I have done the rest of the garden, I can empty and clean the pond and then apply more paint. There is bound to be something that will go on top of Pondseal (as long as I sand it down well).

So today I gave the pond three coats of paint. The strange thing about the Pondseal is that the manufacturer’s opinion of how much paint I need wildly differs from my experience. I estimated that the area I painted last week to seal in the render in the shallow pond was probably close to a square metre, and I did three coats. As 1 litre is supposed to cover 3 -5 square metres, this area ought to require somewhere between 0.6 and 1 litre. In fact I didn’t even use half the 500ml can that I had. The surface area of the raised pond is just over 6 square metres. That should have required at least 3.6 litres, and perhaps as much as 6 litres. I bought 1.5 litres, relying on my previous experience rather than what was written on the can, and used 1 full litre plus some more of the 500ml can left over from painting the shallow pond. I therefore have an unused can, which I can either return to the garden centre or keep for further work on the shallow pond in spring, once I find out where it needs attention. Or maybe I can use it to coat concrete blocks which I will put in the pond to stand plants on.

So maybe I should feel a little uneasy about the huge discrepancy between the amount of paint I have used and the amount that I “should” have used. Perhaps my render was not porous enough. But on the plus side, the black colour didn’t come off into the paint when I painted over it, so I am daring to hope that I may have sealed in the pigment. And the pond looks black and shiny, so it seems that some of the first lot of paint must have been absorbed before it got washed off.

The pond, painted with two coats of V8 Pondseal and surrounded by dustsheets.

The pond, painted with two coats of V8 Pondseal and surrounded by dustsheets.

\

Friday 23 September 2011

Biannual apple tree

Filed under: Apples — Helen @ 3:57 pm

Yes, I know, you wait three weeks for a blog post and then two come along at once. But I couldn’t resist this. As I was wandering around my garden after the third coat of pond waterproofing, I noticed that my Discovery apple tree was having another go.

Apple blossom in September

Apple blossom in September

I have been convinced for some time that many of the inhabitants of my garden are deranged, and this is clearly another one. I should not have been worried about my apple trees going biennial; this one wants to go biannual.

But it’s still going to get dug up in November.

\

Pond time

Filed under: Pond — Helen @ 1:50 pm

I have done a little earth moving this month, but the next stage is on hold until the apple trees go to sleep and I can dig them up. Meanwhile, the weather has been much kinder than it was in the summer. I mended my second water butt and so far it is holding water. But even more importantly, this is an opportunity to tackle the ponds.

The shallow pond after the first coat of waterproofing

The shallow pond after the first coat of waterproofing

You can see that the construction of the shallow pond mainly uses pond liner, with some render applied to the side of the block edging. The pond will not fill beyond the join between render and pond liner. So today I have applied some waterproofing compound to the render. I do not know whether this will allow the pond to fill completely, because it could be leaking from the join between the render and the pond liner. But I am pretty sure that the render needs waterproofing. For one thing, every time it rains, a small amount of it washes off into the pond, making a yellow-brown sludge. So I have decided to waterproof the render and see what happens. I have a suspicion that this pond will require frequent maintenance. Some of the render is very thin and is bound to crack and fall off this winter. I can see myself having to drain the pond every spring and patch up the render and apply more waterproofing. Still, applying waterproofing is not too bad a job. The paint goes on easily, and the brush has to be cleaned with cellulose thinners, which smell heavenly.

And next, if the weather continues to be dry, I will lift up the tarpaulin and take a look at the raised pond.

\

Friday 2 September 2011

Water butt repair

Filed under: Progress — Helen @ 2:33 pm

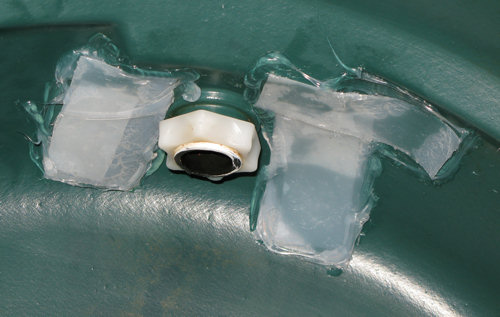
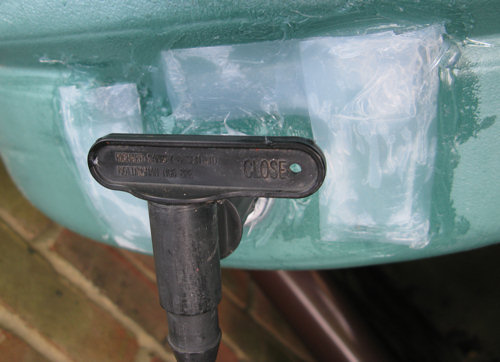
This week has been fine and dry, and the forecast for today and tomorrow is the same, so I decided it was time to try repairing one of my water butts. If it works, I will do the other one that is leaking. I took the advice at http://www.growfruitandveg.co.uk/grapevine/top-tips/water-butt-repair_33901.html. This means emptying out the water butt and turning it on its side, then cleaning and drying the area around the cracks, both inside and out. Then cut out some strips of plastic from a milk bottle, coat liberally with silicone sealant, and stick to water butt, both on the inside and out. The theory is that the pressure of the water will hold the plastic in place on the inside. I don’t know whether the plastic on the outside helps with the current leak, but it may add some insulation against future frost damage, and so I thought I might as well put it on.

Water butt repair on the inside

Water butt repair on the inside


And here is what the butt looks like on the outside.
Water butt repair on the outside

Water butt repair on the outside

The silicone sealant I used is suitable for interior and exterior use, but is not meant to be permanently underwater, so I don’t know how long the repair will last. Given that the water butt will probably develop another leak in the next couple of years, I will be well satisfied if it lasts for two winters before I have to redo it. I used translucent sealant, which I think looks better than white or black, but I realise I am not going to get any marks for aesthetic appeal. I just want to not be sprayed with water every time I go past the water butt after it has been raining.

I will leave the water butt to dry for 24 hours, and then connect it up, and hope it works.

Note added 16 August 2012: This repair lasted for almost a year – today was the first day I noticed that the butt was dripping again. I am going to try the same method but using a sealant designed for underwater use. Search for “butt” in the blog if you want to find out how I got on.

\