Helen's Garden Renovation Project

Monday 28 May 2012

Oxygen and colour

Filed under: Pelargoniums,Pond,Progress — Helen @ 12:36 pm

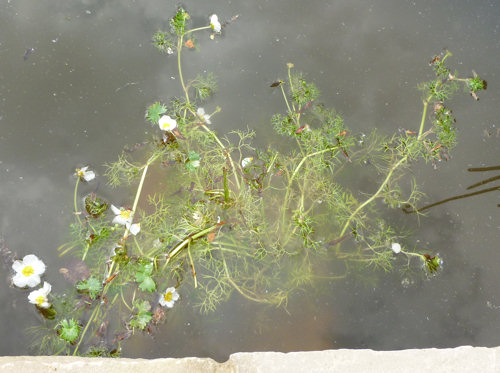
Today may be our last day of hot, dry weather. I went out and finished off the job of repotting the oxygenators and marginals. As far as vigour goes, the winners are the Ranunculus aquitilis (Water crowfoot) and Veronica Beccabunga (Brooklime).

The Ranunculus was growing so well that I felt it was worth taking it off the marginal shelf and putting it down on the bottom of the pond, but not in the very deepest part in the middle.

Ranunculus aquatilis 11 days after buying it

The Veronica beccabunga was also doing very well, sending out lots of shoots and hundreds of hopeful roots. According to its instruction card, it doesn’t want to be drowned, so I left it on the marginal shelf, where it looked happy enough.

Veronica Beccabunga

Veronica Beccabunga, including reflection of my television aerial

The Callitriche (Starwort) and the Hottonia Palustris (Water violet) have been the most restrained. The Myriophyllum crispatum (Upright water milfoil) is making steady progress.

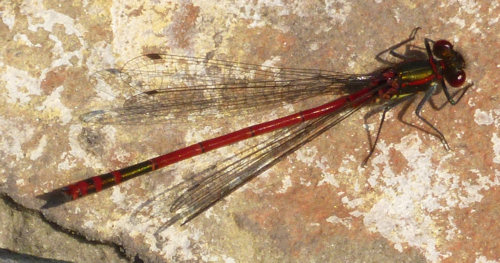
While I was in the mood for playing with the pond, I cleared out some of the leaves in both the ponds with a sieve. I caught three newts in the shallow pond and tipped them into the raised pond. I wonder if they will stay there. A pond skater has turned up, and also I saw a damselfly alight briefly on a stone near the greenhouse.

Damsel fly taking a breather before going on to examine the ponds

Damsel fly taking a breather before going on to examine the ponds

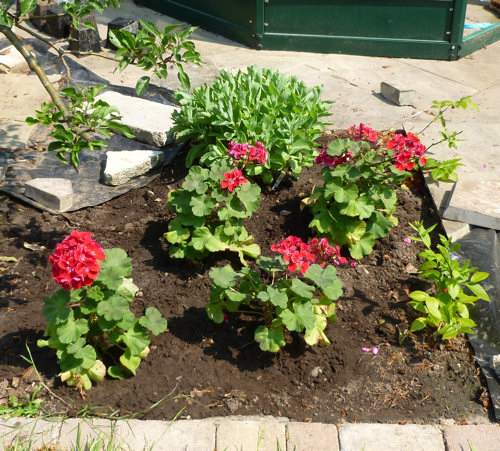
I made some progress on the pot reduction programme. I planted four pelargoniums and a sedum. This not only decreases the number of pots by five but adds some much-needed colour to the garden (see yesterday’s entry). I planted them between the blueberries and the Discovery apple tree.

Pelargoniums and sedum

Pelargoniums and sedum

I also got rid of another pot because it seemed to have in it only a small hellebore seedling. So I planted the hellebore seedling in the marjoram patch, which has plenty of other hellebore seedlings in it. Unfortunately I may be involuntarily getting rid of two more pots. Just when I was congratulating myself on the fact that nothing, nothing at all, had died this winter, I discovered that the two phormiums weren’t well. I think they may have rotted during the wet spring. I should have raised the pots off the patio with a couple of tiles to make sure they drained. Or put them in the greenhouse to give them a rest from the rain.

Number of pots = 65.
\

Thursday 25 November 2010

Still nearly ready

Filed under: Pelargoniums,Progress — Helen @ 10:55 am

I haven’t written anything recently because all I have been doing is to get rid of dead leaves (lots) and weeds (a few). I have now got a quotation for the work, but it’s a lot of money so I have decided to get a second quote to make sure that I am getting the best value.

This morning it was 0 degrees (that’s 32 F if you are American or old) according to my handy digital weather station, but I went out anyway and re-did the chalk lines using a slab of tailor’s chalk that I bought from a local haberdashery shop. This was much better than the chalk pencil because it didn’t break. I explained to the shop owner that I wanted to draw on the patio with it, but didn’t explain why, so he may have thought I was a bit loopy. I used my photographs to remind me where the lines were, and I think I have got it pretty much right. I noticed some fine white particles on the tarpaulin and wondered which tree they had come from, until I realised that of course it was the first snow of the winter. There was not much of it, but it was still snow.

The pelargoniums are not dead yet. I dug up one of my osteospermums because the clump still hasn’t recovered to its original size after the ravages of last winter, and if we have another severe winter I may lose the lot. I have taken the plant indoors and put it in my nice warm sitting room.

I cleared up some more leaves and then went in because my fingers and toes were hurting too much. This time next year I shall do the sensible thing. I shall not draw on the patio and I shall only attempt to do any gardening if the temperature is at least 6 degrees.

\

Friday 13 November 2009

A lovely day for not going out

Filed under: Pelargoniums,Progress — Helen @ 12:08 pm

We have been very lucky with the weather so far, and I have now finished demolishing the raspberry frame. I sawed the posts into three sections and took them over to the right hand side of the garden. I also moved the footings to join the rest of the rubble next to the temporary pond. I have started taking up the foundations of the path to the right of the raspberry frame but this is quite hard work. I will have to break it into sections by creating a score line with my pickaxe and then levering it up so that it breaks along the score line. The foundations are quite hard so this will not be a fast process.

The raspberry frame is no more

The raspberry frame is no more

I am now working on a more accurate version of the plan for the diagonal lawn and pond. I want to lawn to run at exactly 45 degrees to the house, so I have worked out some exact coordinates and plotted them on a spreadsheet, which allows me to create a new scale drawing. The next thing I need to do is to mark out where the lawn will go with poles and string, and spend a long time looking at it to see if I like it. I also need to do this to find out whether I have to remove any more plants or hard landscaping. I may need to dig up the euonymus at the end of the garden, and even one of the apple trees (the furthest one from the house).

The forecast for the next few days is rain, severe gales, and more rain. So the garden will just have to wait until we get some drier weather.

I am sad to report that in this year’s sample of eight very badly taken pelargonium cuttings, two didn’t make it, and this may turn into three failures. Fortunately we have still not had a frost, so I took some more cuttings, still very badly.

\

Monday 20 April 2009

Unable to keep up

Filed under: Magnolia,Pelargoniums,Progress — Helen @ 12:21 pm

In my last post I said that it was difficult to find time to renovate the garden because the demand for tuition was building up. This is still true, but the garden has now decided that it’s time for Spring and is slowing my progress by producing weeds, especially dandelions and bittercress, and by growing (the grass is the main culprit here). All these things need attention, and that reduces the time available I have for the Garden Renovation Project. I have had to repot the Very Badly Taken pelargonium cuttings because they can’t go outside until the end of May. I have also decided to sow some tomatoes this year. My parents gave me some very large pots and I will put the tomatoes in them, which will reduce the need for weeding, and I’ll probably be able to get away with only watering them every two days, unless it is very hot, because the pots are so large.

In case anyone thought that the reason I haven’t mentioned the magnolia which I dug up and stuck in a pot is that it has died, it hasn’t. It hasn’t produced as many flowers as last year, but it’s made a jolly good effort and here it is.

Magnolia in pot with flowers

Magnolia in pot with flowers

So, although I was out for two hours this morning, I didn’t make much progress with the tree stump. After the recent hot weather, it seems to have dried out a bit around the edges, so I sawed off a few slices. I am trying to dig it out but that’s quite a lot of work as well. I think that if I can dispose of it by the end of May, I will be doing well.

\

Friday 7 November 2008

The plastic shed

Filed under: Pelargoniums,Progress — Helen @ 5:58 pm

This week I assembled the plastic ‘sentry shed’.

The plastic shed next to the wooden shed

The plastic shed next to the wooden shed

Overall I am pleased with it and I think it was a good decision to buy it. For the benefit of any other plastic shed buyers out there, here are my comments:

(1) The instructions were so bad it was almost frightening. There were no words – just pictures. The pictures were actually very well drawn, but there needed to be some words. For example, the very first picture showed a hand holding a small rectangle next to a rectangle-shaped hole. It didn’t say which part had the rectangle-shaped hole in it, and it didn’t say whether all the holes had to be filled with small rectangles or just some of them. Realising that it would be impossible to get the rectangles out of the holes after snapping them in, I wondered what the holes were for and whether some of them should be kept open so that something else could be slotted into them. Afterwards I came to the conclusion that the holes were probably an artefact of the manufacturing process, but this is the sort of thing the instructions should have said.

(2) Putting the pieces together was mostly easy, but I was worried that I might connect the wrong parts and be unable to pull them apart afterwards.

(3) Some pieces snapped together very easily, but others required considerable force to make them click home. This was difficult to achieve because if you whack plastic with a hammer it is likely to split. I found the best technique was to hang onto the top of the shed and gradually apply as much as my bodyweight as necessary to push the pieces into place. I suggest that anyone weighing less than 65kg should probably eat a few cakes before attempting to assemble this shed.

(4) The construction of the shed seems to be sturdy and the shelves are well supported.

(5) I think it took me about three hours to assemble the shed, but I took my time because I didn’t want to risk doing anything wrong that couldn’t be undone. If I had to assemble a second one, I think I could do it in well under an hour. One person can do it alone, but you may need a stepladder.

(6) One disadvantage of the shed, for me, is that the space for storing tools is not very high. I cannot get my lawn rake into either shed, which is a shame. Also there is not very much space allocated to storing tools.

(7) The other disadvantage of a plastic shed as opposed to a wooden shed is that it is harder to fix hooks to it to hang things on. I may be able to use self-adhesive hooks, though. And as I said, there isn’t much hanging space anyway.

The interior of the plastic shed

The interior of the plastic shed

The next thing to do is to buy a padlock for the shed, and then I will have to put things in both my sheds to make room for the greenhouse. I need to think about what will go in the sheds, but for now I will just put in as much as I can so there is plenty of room in the garage.

Other reports: The very badly taken pelargonium cuttings are cheerfully getting on with producing some very badly grown roots and show no signs of getting very bad rot. I haven’t seen the cats in my garden, but I also haven’t seen them anywhere outside, so maybe it is too cold for them and they are doing their business in their litter trays indoors. I do hope so.

\

Thursday 16 October 2008

The boring stuff

Filed under: Pelargoniums,Progress — Helen @ 5:54 pm

Now that my hedge is underway, I am planning to spend a couple of weeks doing boring things like weeding the right-hand side border, tidying up the leylandii logs, and clearing up dead leaves, in between gawping at the stock market indices with horrified fascination. Then it will be time to start digging the trench for the cable.

I have been having some trouble with cats treating the area around the hedge as their toilet. My neighbour (not the one who owns the cats) suggested a product called “Get Off”, which consists of very smelly green crystals. He has been using it himself, which is possibly why the cats have chosen my garden for doing their business in. So I went down to Wilkinson to get some (£2.99 for 40 square metres’ worth). I decided to treat the cats’ favourite entrance route first and see if that puts them off, so I scattered the crystals on my new border along the fence and up to where I have planted the half-hardy annuals. If I can stop them coming into the garden in the first place then I won’t have to treat the whole area. As I weeded the other end of the garden, I could smell the crystals very strongly. I may have overdone the rate of application. I think I need to put the bottle in the garage, not in my living room, now I have opened the seal. That’s not to say it smells unpleasant – it’s just very strong.

The very badly taken pelargonium cuttings are looking well, and are flowering on their incorrectly chosen flowering stems.

\

Friday 10 October 2008

Installing the thuja

Filed under: Conifers,Pelargoniums,Progress — Helen @ 4:35 pm

After the heavy rain on Sunday and Tuesday, we have had another gorgeous warm October day, which seems all wrong given that the world is going through the biggest crisis that many of us have ever known. Last time we had a really big stock market crash, in 1987, loads of trees blew down at about the same time. I am hoping that there won’t be a repeat of that because I have put a lot of hard work into planting these thuja.

First lot of thuja planted

First lot of thuja planted

When I calculated how many thuja I would need, I decided that I needed the same number as the leylandii (10) plus two extra to make the hedge a bit longer, and therefore I bought 14, to include two spares. However, what I forgot to check was the spacing of my leylandii. I planted them (correctly) 2.5 feet apart, but thuja want to be 2 feet apart. So my four leylandii really needed to be replaced by five thuja. Actually, I decided to only plant four at this time because the fifth one might struggle a bit, being very close to a well-established leylandii, but it looks like I will need all 14 of my thuja. I just hope that they perform better than my HBOS shares.

I used my final bag of organic compost in planting the thuja. I put some in the planting hole, and spread the rest around the area, making sure that it didn’t touch any of the plants. My neighbour said that when she used the same compost, she got a load of mushrooms, even though it was May. If I get a good crop, I will take some photos.

My very badly taken pelargonium cuttings haven’t died yet.

\

Sunday 28 September 2008

Excavations

Filed under: Conifers,Pelargoniums,Progress — Helen @ 3:13 pm

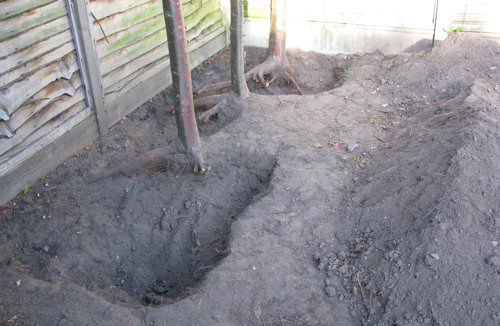
The past two weeks have been exceptionally fine and sunny, with hardly any rain. I have had six stints at the conifer excavation site, each lasting about one and a half hours, and after all this work I have removed two of the trunks. After cutting through the biggest roots, I pushed the tree over in several directions until the rest of the roots snapped or were exposed enough for me to see them and snip through them.

Removal of first conifer

Removal of first conifer

It is then necessary to dig a bit deeper to remove the snapped off roots to enough depth to give the new resident of the hole plenty of room to grow. Well, probably it is. I’m not taking any chances, as I do not intend to be replacing the next lot of conifers.

Roots exposed after Saturday\'s stint of digging

Roots exposed after Saturday's stint of digging

I took the two photographs above yesterday, but this morning I made some more progress. I dug up the conifer next to the one I took out on Saturday. This involved sawing through one root with my lovely chipboard saw, which was a Christmas present from my parents in 1987. I did not use the scary Alligator because it was only about nine o’clock on Sunday morning and I thought it might be a bit noisy, and I didn’t want to get mud in its teeth from the dirty root, not because I was too scared of it. It’s a perfectly safe tool if used sensibly.

I have given the potted plants their third dose of Wilkinson’s Wonder Gro, so that should keep them quiet until March. I think I will have to give them some more Vine Weevil killer too as it is only supposed to last for four months. Perhaps I can do that on Monday, which is forecast to be another fine day. It will make a change from digging.

On Friday I took some cuttings of my pelargoniums very badly. According to Gardeners’ World shown that very evening, I should use a knife sharp enough to dig into my thumbnail, choose non-flowering stems, and put the cuttings round the edge of a pot, using compost with bits of grit in it. Instead, I snapped the cuttings off without using any weapons, not caring about whether the break was particularly near a nodule in the stem or not, pulled off the lower leaves, and put them in B&Q stem and cutting compost, on special offer last spring. I put each one in a separate pot. Out of my seven cuttings, six were flowering or in bud. I have put them on a sunny, cold windowsill. (The windowsill is cold because it is in a room I hardly ever heat, and it’s now cold enough to need heating in the mornings and evenings). Let’s see what happens. My hypothesis is that taking pelargonium cuttings is so easy that even if you do it very badly, they will succeed. If I am wrong, and I don’t realise they are dead until the frost kills the pelargoniums outside, it doesn’t matter because I have a plant growing indoors and can take some cuttings off that in the proper manner. I will, of course, report the outcome honestly in this blog.

Very badly taken pelargonium cuttings

Very badly taken pelargonium cuttings

\