Helen's Garden Renovation Project

Monday 28 February 2011

The most ambitious Leylandii removal yet

Filed under: Conifers,Progress — Helen @ 10:53 am

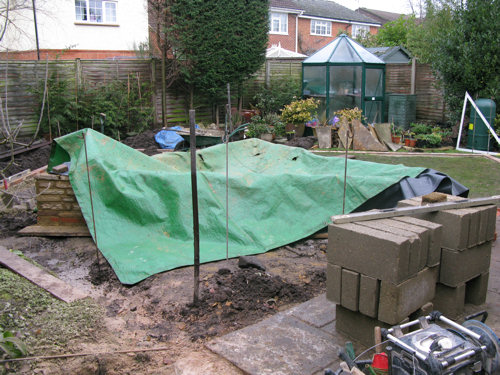
I decided to try a new way of removing Leylandii, now that I am so experienced at digging up trees. Normally I cut through the trunk at about six feet above the ground so that the tree isn’t so tall and heavy. But I decided to remove the tree whole this time, mainly because the trunk is very thick and would be hard work to saw through while the tree was vertical. Firstly, on Friday I dug away the soil around the rootball and cut through all the small roots. This took two hours.

Preparatory digging to expose the roots

Preparatory digging to expose the roots

Then I tied the tree to the ones next to it, using two ropes. I sawed through the biggest roots, which took about half an hour, and then I gave the tree a little push to encourage it to fall in a direction where the greenhouse wasn’t.

Tree beginning to topple over

Tree beginning to topple over

Then I gradually paid out the top rope and let the tree continue to fall.

Timber!

Timber!

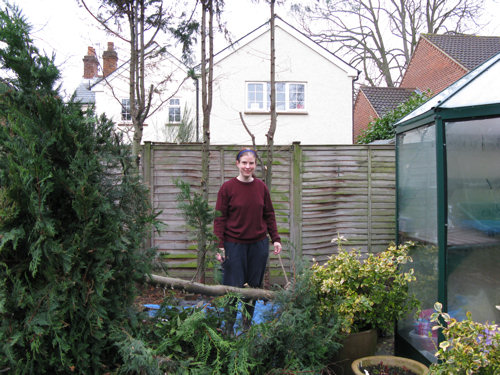
And finally I took a picture of myself standing next to the tree (and the intact greenhouse) after it had finished falling down.

Tree now successfully horizontal

Tree now successfully horizontal

Then I decided I had had enough of sawing through things, and did a bit of quiet weeding until it started raining. I think getting rid of a tree this size on your own is a bit like walking across hot coals – it looks as if it is very dangerous and scary, but actually it isn’t, as long as you understand some physics and have some good strong rope (rope probably less of an advantage for coal walking).

Mathematicians and scientists will have spotted a problem with my method for getting rid of four trees in this way. It requires at least n + 1 trees, where n is a positive integer, because you have to tie the tree you are removing to another tree. There will therefore be a problem with the implementation after I have removed three trees. However, the middle of the three remaining trees has a trunk division at an easy height to reach, so I will tie the two small upper trunks to the other trees, cut them off, and then remove the trees at each end, using the middle one as the support, and then I will dig up the middle one without the help of ropes because it will be short enough to do this under control.

No brimstone butterflies today. I think it was too damp and cloudy.

\

Thursday 24 February 2011

Why it is difficult to work out a planting plan

Filed under: Brimstone butterfly,Conifers,Progress — Helen @ 6:04 pm

After my plants from Buckingham Nurseries arrived, I ordered some more plants from Burncoose Nurseries in Cornwall. Their plants were more expensive than those from Buckingham Nurseries (although bigger) but they do an excellent range of plants that are hard to get from anywhere else. I ordered an acca and a kalmia. The kalmia, together with the holly that I bought from Buckingham Nurseries, will replace the bay tree and will help shield the compost bins from view. I also ordered a skimmia to go in the side border. I wanted a female one because it does berries and because there are some male ones in the communal shrubbery on the other side of the road, and I thought it was a bit of a waste having male skimmias if there weren’t any female ones for them to have berries with.

Last Friday my package arrived, and I was very pleased it was so quick, as the website had said the kalmia was out of stock. But then I pulled out the delivery note, and saw that the package apparently contained three Coronilla plants for someone in Whitby with a very similar surname to mine. The courier was long gone, and I realised that I had to unpack the parcel, whatever it contained, because otherwise the plants would die. So I unpacked it and it did indeed contain three Coronillas.

Burncoose Nurseries kindly let me keep the Coronillas, which was sensible because I don’t think they would have been very healthy after having two journeys in a cardboard box, and so I had to look them up on the Internet because I had never heard of them. Apparently it’s a very nice plant, which flowers a lot, but can be susceptible to a very cold winter. I think I will plant one of them in my front garden, by the house wall, where it will get lots of sun and a bit of frost protection. They don’t live very long even if they don’t get frozen to death, so I may take some cuttings in the summer if I decide I like it. But by then the acca may well be big enough to take up all the available space itself, so I may not want to plant a replacement coronilla. Anyway, events like this are why it is difficult to work out a planting plan.

Burncoose Nurseries sent out my proper order straight away, and here is a picture of my new plants. I have given one of the coronillas to my friend Sharon (whose husband Graham helped me demolish the last lot of Leylandii).
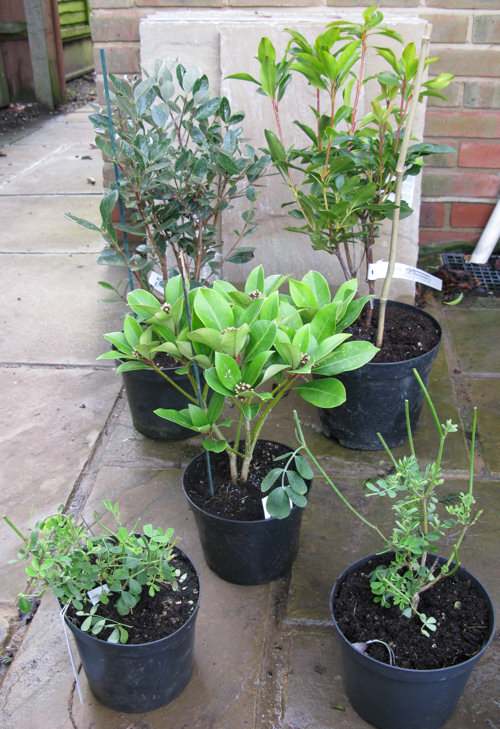
Acca, kalmia, skimmia and coronillas

Acca, kalmia, skimmia and coronillas

The first part of the week has been quite dull and rainy, although I haven’t minded because I have been working and not gardening. This morning, however, gave us some abundant sunshine, and some warmth, and it was the most glorious thing to be out there, savaging the Leylandii.

I looked under the tarpaulin to see how much water was in the pond, and it was bone dry, despite the fact that it rained nearly all day yesterday, and has been raining a lot on other days too. This is brilliant news because it means that either the concrete has finished curing and giving off water, or I have found a more effective way of keeping the rain out. And either of those is good. I shall give it another two weeks, and if there is still no water in the pond, I may dare to hope that it is time to give it some more coats of pond paint.

The shallow pond has filled up a lot. And this morning, for the first time, I saw dead frogs on the road. I don’t really want them to spawn in the shallow pond because I need to seal the concrete and remove any concrete debris that has fallen in it first. If they do, I will put the spawn in the temporary pond, and the newts will eat it, and that will be very sad but no sadder than the frogs getting run over.

Spring has come. The evidence is as follows:

Pink pulmonaria

Pink pulmonaria

The pink pulmonaria has been in flower for at least a couple of weeks, but the blue pulmonaria hasn’t quite got going yet.
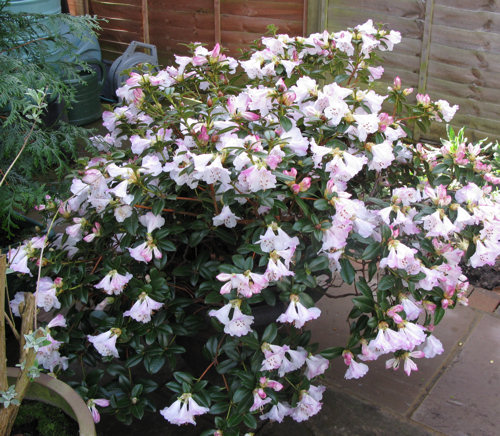
Early rhododendron in full bloom

Early rhododendron in full bloom

My earliest rhododendron is gorgeous this year because there has been no frost since its buds started opening.

I saw my first brimstone butterfly.

I sowed some hellebore seeds from Chiltern Seeds last year. They wanted to be left for a certain number of weeks at a complicated temperature, so I put them in the fridge and then took them out, but nothing happened, so I put them outside, with the pot still inside a plastic bag, and when I looked at them this morning, there were two seedlings.

So it is definitely spring.

Apart from monitoring the seasons, I went to the dump with some rubble, and chopped some more bits off the Leylandii. When the soil dries out a bit more I am now ready to dig the first one up.

\

Thursday 17 February 2011

The last of the Leylandii

Filed under: Conifers,Progress — Helen @ 1:38 pm

We have had even more rain since my last post. Today I lifted the tarpaulin off part of the pond and scooped out a bucketful of water from the centre of the pond. There was too much to mop up with newspapers, as I had originally planned to do. But the good news is that the water was much less black than it has been. I suppose I will have to wait until the water is completely clean before I can declare the pond has finished drying out and that it is time to recoat the concrete. I still have no idea how long that will be. But at least things are going the right way.

Meanwhile, we had a dry day yesterday and last night, so this morning was a reasonable day for gardening. I cut some bits off the Leylandii, shredded them and put them in my council garden waste bags. I also cut some bits off the bay tree and shredded them, but I kept the shreddings for my compost bin – I don’t want to put too much Leylandii in my compost in case it makes it too acidic.

These days I am doing a lot of staring at the garden and wondering what to do with it. I think one thing that is important is to work out where my main routes are. For example, how do I get to the large blue conifer at the bottom left of the garden? And how will I access my apple trees and vegetable plots? I don’t want to be walking across the lawn too much, although the occasional journey won’t matter.

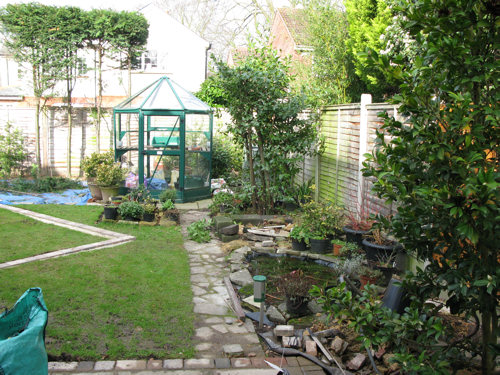
I also realise that the view from the kitchen window is absolutely crucial. This is what I have at the moment:

View from kitchen window

View from kitchen window

And this is a higher-resolution picture of part of the view:

A close up view of the camellia, pond, bay tree and rubble

A close up view of the camellia, pond, bay tree and rubble

As you can see, there is a lot of rubble there at the moment. The bay tree still just about hides the compost bins from view. The compost bins are not that ugly, but I prefer to have plants in front of them, and I will have to work out where I can put them and still have a path leading to the compost bins. The bay tree, as I said earlier, is going because it is right where I want to put the path.

The rubble piles are decreasing, as I have been to the local tip twice since the landscaping work was done. It is best to go there early as there is no queue. There were also two nice young men working there, whose eyes lit up at the sight of a lady unloading her car into the rubble bin and rushed over to compete for the privilege of lifting the biggest piece out of the boot. I was grateful, as it is a lot easier to lift heavy things into the boot than it is to lift them out again. (This is simple physics – the hardest part of lifting a heavy thing is when your arms are outstretched. When you put the heavy thing into the boot, you are controlling its descent downwards, which is not very hard. When you lift it out, you have to lift it upwards with your arms stretched out, which is harder). I will have to go a few more times when I take up the path at the left hand side of the garden.

The Met Office is promising us a dry spell after half term, so I am hoping it is right. If so, I will carry on with soil shifting and I will dig out the Leylandii roots. And then it really will be time to start planting things.

\

Friday 11 February 2011

Rain and plants

Filed under: Progress — Helen @ 4:48 pm

After all the useful dry weather, we have had a spell of rain. It’s still possible to do Leylandii pruning when it’s been raining for a long time, but I will have to wait for the soil to dry off a bit before I do any more soil moving.

My plants from Buckingham Nurseries arrived.

New plants from Buckingham Nurseries

New plants from Buckingham Nurseries

As there is a possibility of some colder weather in the next week, I decided to put some bubble wrap around their pots. I usually take a Spartan approach to plants, but they are only lickle and I don’t want any of them freezing to death before I’ve had a chance to plant them.

I am getting a little worried about the pond. Some more water got in, which wasn’t surprising after the very heavy rain, and the oily patches are back. I think yet more pond paint is washing off. I think I shall have to mop it up with newspapers and stuff it into charity bags to get rid of it, as I don’t want to pour any more onto the soil and I don’t want to carry buckets of it through the garden in case I spill it and stain the paving slabs. I readjusted the tarpaulin. It is very difficult to get it to stay in a tent shape because if there are any local minima in the structure, they fill up with water when it rains, and become even bigger minima as the weight of the water pulls them lower. I could do with a wooden frame to hold the tarpaulin in a tent shape. I could reuse the frame in autumn to keep the leaves out. That could be quite useful, but I need to design it so it doesn’t take up a lot of storage space.

\

Monday 7 February 2011

The tarpaulins are back

Filed under: Progress — Helen @ 11:47 am

The landscaping work is now all done and paid for, and I have my garden back again. I have been spending a lot of time moving some of the piles of earth about and making the surface approximately level again. I have been clearing up bits of loose rubble and sand because they will make the soil alkaline, which is no good for rhododendrons and the pieris. I have also covered up some of the bare areas with tarpaulins – sorry to the two readers who didn’t like the tarpaulins very much. Although the cats have mostly stayed out of my garden, despite all the lovely crumbly earth, they don’t stay out completely. It’s much better than it was before I got the cat repellers, but they are not 100% effective. Also, tarpaulins do cut down the weeds quite dramatically.

The tarpaulins are back again

The tarpaulins are back again

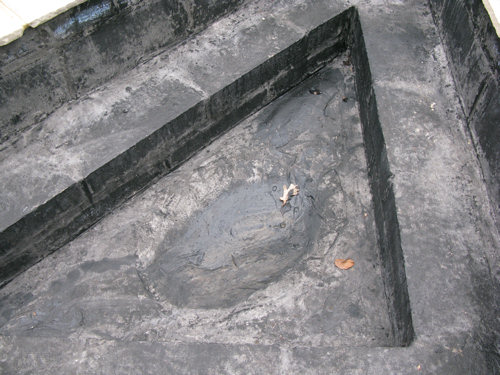
Today, for a change, I was going to do something about the raised pond. It has rained very slightly since the pond was painted, and there were some little puddles of water that looked a bit oily. So I thought I would remove that water, and wipe the surface dry, and then start filling it from my water butts. But when I scooped the water out of the bottom of the pond, I found that it was quite thick with black pigment. And the concrete underneath was showing. In fact, the pond paint had never managed to dry in some places, and the coverage was not very good at all! I scooped out all the water and wiped the surface dry with paper towels, which were thoroughly blackened.

Poor coverage of black pond paint

Poor coverage of black pond paint

My theory is that the concrete is still curing, and giving off water. This has prevented the pond paint from drying and has also led to the creation of little puddles, which may not all be rain water. The only solution is to wait. I have bought some clear waterproofing paint to use on the mortar joining the blocks and the liner of the shallow pond, and that says that I should wait “some weeks” for the render to cure. Although the black pond paint is a different product, I expect the same rules apply. I was not worried about Richard applying the pond paint so soon after making the pond because I know that different rules apply to professionals. For example, you or I would wait four hours for a coat of emulsion to dry before applying another coat. A professional will cheerfully apply three coats in a morning, and two years later the paint still hasn’t fallen off the ceiling. But I think in this case even professional courtesy was not enough for the pond paint to set.

So I have put the tarpaulin back over the pond. I have put blocks and some of my blue plastic boxes on the pond shelf so that that tarpaulin is a tent, with all three corners held down. This means that some rain may blow in through the edges, but more importantly, air can circulate and the concrete will have a chance of curing. I think that when the landscaping company put the tarpaulin on to keep the water out, they may have sealed off the area too thoroughly, thus slowing down the drying process. I will check the pond for puddles every week or so and adjust the tarpaulin as necessary, and when there is a dry day in March or April, I will brush off any paint that flakes off, give it a good wash with clean water, dry it, and paint it myself, following the instructions on the tin. I would like to use black paint, but unfortunately I am quite capable of spilling and splashing it everywhere, all over my lovely expensive blocks and slabs. Fortunately I am also quite capable of covering the entire outside of the pond with newspaper, held on with sellotape or masking tape. I will just have to wait for a good long dry spell, without too much wind (so the newspaper doesn’t blow away).

So for now the pond is sitting quietly, hardening itself off, and I can concentrate on the plants. I have ordered two new thuja plants from Buckingham Nurseries. Since carriage is £8.95, I also had to order some holly (Ilex J.C. van Tol), some pyracantha to stop the foxes breaking my new fence panel and some chaenomeles to grow against the side fence. The total price was £28.20 which is great value for seven plants. The holly is a female, self fertile, non-prickly plant which I am going to use instead of the bay tree to hide the compost bins.

Final note: I think that I should add, in fairness, that the company I used is highly professional and they would probably come and sort out the pond paint problem if I asked them to. I have decided that I will do it myself because I can choose optimal conditions for the job, and will be able to leave the ideal period between coats, and I won’t have to make any arrangements to leave the garden open for them if I am out, and so on.

\

Sunday 30 January 2011

Pond and lawn revealed

Filed under: Progress — Helen @ 6:04 pm

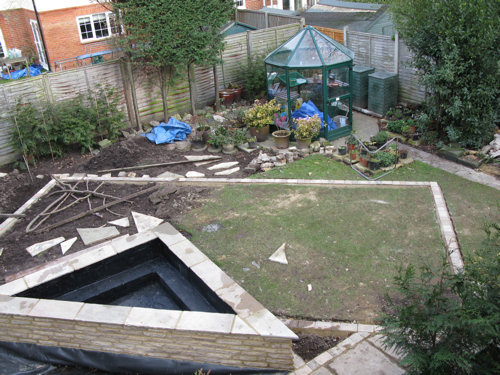
Today it was time for the covers to come off, and here is the finished result:

The ponds, seen from the left hand corner nearest the house

The ponds, seen from the left hand corner nearest the house

A puddle has already formed in the shallow pond, but the raised pond has no water in it because it has spent most of its time covered up with a tarpaulin.

The lawn viewed from the left hand corner nearest the house

The lawn viewed from the left hand corner nearest the house

I would have moved the paving slab on the lawn, but it was frozen stuck to the grass and I thought it best to leave it where it was for the time being.

The lawn as seen from the left hand corner furthest from the house

The lawn as seen from the left hand corner furthest from the house

As you can see, the pond has been finished with black waterproof paint. I had thought that a stone finish would look better, but Richard said he had tried that before and it didn’t look very good – you could see all the debris and dead animals in the pond. So I went with his judgement, and the pond looks very smart. I think that the mortar between the edging and the liner of the shallow pond needs sealing to prevent chemicals leaching out, but this should ideally not be done for another two weeks at least. I had a bottle of the stuff I used to repair the original pond some years ago, but it has dried up now. I will get some more and put it on sometime in February. In the meantime, I can make a start on filling up the raised pond as soon as the rain fills up my water butts. (We had to drain some of the water butts because they were leaking and they would have interfered with the setting of the grouting. I am less impressed with water butts than I used to be because three out of four of them now leak and, given their cost and how long they last before starting to leak, I am not sure they make economic sense).

There is only one thing that I have asked the landscapers to change – the last block of the edging of the shallow pond on the line going directly away from the house has been slightly displaced. It’s not very noticeable on the photograph shown above, taken from an upstairs window, but it does show when I look out of the patio doors at the garden. I think this is deliberate, to allow for an overflow channel for the shallow pond. But I don’t think a ground-level pond needs an overflow channel. I think the water will work out for itself what to do if there is too much of it. And anyway, there will still be a gap if the block is moved into alignment with the others.

So now I am continuing to work out what to do with the plants. You can see from the pictures that I have put the rubble to use as stepping stones. I need to get the soil redistributed and either cover up the bare earth or plant it before the weeds start going, which will be sometime in March, depending on how crisp our spring is this year. Fortunately it is quite cold and dry at the moment, which is ideal for shovelling soil about.

\

Thursday 27 January 2011

Finishing up

Filed under: Progress — Helen @ 3:59 pm

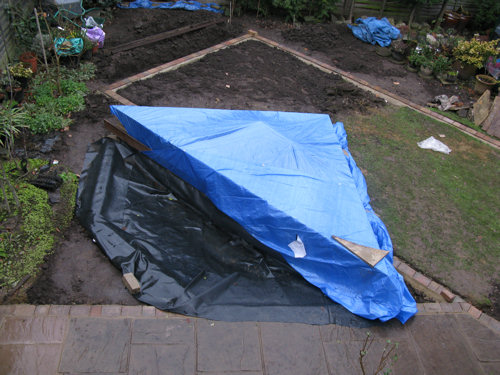
The pond and edging are nearly finished, but I still can’t show you a good picture of the pond, because it has been wrapped up in a tarpaulin to keep the rain out while the inside is being concrete-washed and waterproofed.

Pond covered with blue tarpaulin to keep the rain off

Pond covered with blue tarpaulin to keep the rain off

I have been spending a lot of time while out walking or on my bike thinking about how to arrange the rest of the garden and what to do next. The fundamental questions are:

(1) Shall I move both the apple trees, or just one, or none?
(2) Where am I going to plant my three blackberries?
(3) What sort of path do I want to the greenhouse and compost bins?
(4) Where am I going to grow my vegetables, and how do I separate them into beds so I have easy access?
(5) Shall I finish taking up the path that runs along the left-hand fence, or shall I leave some of it there?

I have not yet worked out answers to all of these questions, but have had some ideas so far.

The main all-weather access required has to be to the compost bins. It doesn’t matter so much if there isn’t a path directly to the greenhouse. I could have a path running parallel to the right-hand fence and about three feet from it. Here is a picture borrowed from a previous post:

The bay tree from http://www.helenpercy.com/gardeningblog/2009/09/06/and-now-it-is-autumn/

The bay tree from http://www.helenpercy.com/gardeningblog/2009/09/06/and-now-it-is-autumn/

The path would run straight through the temporary pond and the bay tree. I would remove the crazy paving path that currently runs about six feet to the left of the fence, and then use the space for planting and the new version of the temporary pond. (I have decided that I like having a pond visible from the kitchen window, and although I know that having three ponds in a 40 ft square garden is a bit mad, I don’t care. Anyway, it will only be a small one). This is very sad for the bay tree, which is a magnificent plant, but it is a bit big. I have a smaller one in a pot, and will plant it nearer the house for easy leaf-picking, and will keep it a lot smaller.

I have also thought that I could have a set of three or four posts running along the new path, either to the left or the right, for growing the blackberries. Another option is to grow the blackberries along the fence but it may make it hard to get at the ivy and I think I may prefer something more substantial there, to help hide the compost bins.

I haven’t yet come to a decision about the apple trees, but they could go in the vegetable growing area, behind the long edge of the lawn. I have also thought it would be nice to have a line of bedding plants and/or bulbs behind the long edge of the lawn so there would be something pretty to look at all through the year. The courgettes and other vegetables could grow behind them.

There is a strip of garden behind the greenhouse which should still get some light through the greenhouse. I may try growing runner beans there. One reason for this idea is that the plot would be bare from October to May, and therefore there would be nothing in the way when the thuja hedge gets enormous and needs annual trimming.

So I have spent a couple of hours today taking bits off the bay tree and the Leylandii and doing a bit of soil moving. To save on costs, I stipulated that no waste should be removed from my garden after the works, and therefore I have a good selection of bits of paving, which I have started using as stepping stones to cut down on the mud transfer rate. While I am cutting up and shredding the branches, I can continue to think about what will go where. I think it will take me about two years to sort this out, and then I can get the final hard landscaping done.

\

Friday 21 January 2011

Day Four

Filed under: Progress — Helen @ 5:00 pm

This morning it was again a little less cold – above freezing again at 1C. There was a little drizzle when I went to get the papers, and the roads were damp as if it had been drizzling overnight. The sunrise was a bit red, but I hoped that it didn’t mean it. Fortunately the rain had stopped by the time it got light, at about eight o’clock, and later on there was even sunshine.

This picture shows where the project got to yesterday, in better lighting.

The shallow pond, shaped and reinforced with concrete

The shallow pond, shaped and reinforced with concrete

The first job was to build up the inner wall of the pond. There was also plenty of grouting to be done.

Raised pond with most of the inner wall built up

Raised pond with most of the inner wall built up

I’d asked the landscaping company to replace two damaged fence panels while they were at it. This is not really Renovation but Maintenance, but had to be done. The fence is made of slotted concrete posts, so in theory, old panels can be slotted out and new panels slotted in, but this only works if the surrounding plants have not pushed out the posts. Mike had to attach a spare batten to make the fence panel stay where it was put, and it was not possible to move down the concrete gravelboard on the panel opposite because the fence was so overgrown with ivy (from the other side). Another annoying thing is that fence panels now come in a different size. WHY DO THEY HAVE TO DO THIS? Still, I am not really bothered because the most important thing is for the fence to be stable and functional, and it is.

The next thing was to lay the pond liner for the shallow pond. This was not easy because of its shape. A layer of sand was laid, and then a few bits of spare liner were put over the sand to provide some extra cushioning. The liner at the long straight edge was slotted into the wall of the raised pond, just above the engineering bricks. This was done by chiselling out the mortar. To hold the liner in place while re-mortaring, you shove in bits of cardboard. Mike said the liner was held in by small bits of stone shoved into the joint – mortar alone wouldn’t have held it.

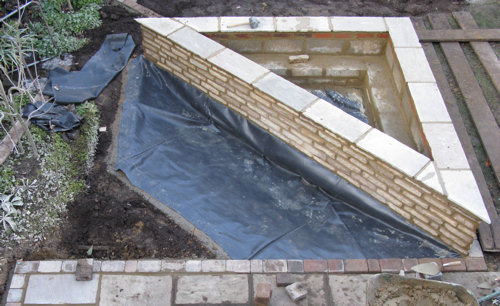
Then the coping was laid on the top of the raised pond. Note there are two very sharp corners. I shall have to watch those and if I get too many bruises, I’ll have to grow some very soft plants around them.

The raised pond with the coping finished

The raised pond with the coping finished

Here is a picture of the entire construction.

The whole construction at 3 p.m. on the fourth day

The whole construction at 3 p.m. on the fourth day

About an hour after this picture was taken, I looked out of the window and wondered what was supposed to happen with the left hand edge of the shallow pond, as you look from the house, so I got the plan out, and realised to my horror that the edging had taken a wrong turning! The problem was at the right hand edge of the raised pond – instead of coming in at right angles to the patio, it was supposed to turn off and meet the patio at 45 degrees. I rushed out and said those dreaded words, “I’m sorry, but I think you’ve done it wrong.” Fortunately, it was quick to put it right. We decided to keep the edging that was running along the entire length of the right hand side of the raised pond since it made the triangle isosceles. We could have kept the line as it was, but I thought the lawn would look odd – instead of being a rectangle with a triangle cut out of it, it would be a rectangle with a triangle cut out of it and another triangle added onto it. The triangular bed that the three edges have made is very small, but I have decided which plant will go in there. It will be the dwarf rhododendron that my neighbours Nick and Mel kindly gave me when Dave died. It will flower at about the time of his death every year, if it keeps good time, and it will be right next to the pond, which is exactly where Dave would have spent the most time if he had lived to see the completion of my garden.

The light has gone, and so have the landscapers. They will be back tomorrow for a bit of finishing up, but now the covers are on the newly concreted and mortared structures, and it’s time for a rest. You might think that I have no right to feel tired, and I would agree with you, but at the start of this I really didn’t know whether I would love or hate the implemented design, and it has been such a long time in the planning. Richard said, before starting the project, that it would look amazing. I don’t know whether he says that to everybody, but on this occasion he was right. It does look amazing.

\

Thursday 20 January 2011

Day Three

Filed under: Progress — Helen @ 5:26 pm

It was not as cold this morning as yesterday morning: just above freezing at 0.2C. Today the main job was to get the liner and marginal shelf put in the raised pond. The method was to put the liner in first, and then build up the inside of the pond with blocks, odd bits of rubble and concrete. This means that very little liner will show at the end.

Richard chiselled out a hollow in the middle of the pond, making the maximum depth about 60 cm. This is to provide some protection for the inhabitants against extreme cold. I am not currently planning to put any fish in the pond, but I may do so later. Then he put in the liner. Then it started raining, despite the fact that it had been told not to do this by the Met Office. This is why my photograph has a tarpaulin over the pond.

The pond liner is put in place - just as it starts raining

The pond liner is put in place - just as it starts raining

Richard then started on the marginal shelf, which I had estimated needed to be 20 cm below the water surface. But I realised I hadn’t checked this, and I put a probe into the temporary pond to see how deep its shelf was, which I think is about the right height. It was about 24 – 27 cm. So the marginal shelf needed to be deeper, especially allowing for the fact that the water level will not always be at its maximum. I can always put pots on bricks if they are too low down, but can’t do anything about it if they are too high up. So we managed to do a slight change of plan, which will make the marginal shelf about 27 cm below the surface, which will do nicely.

Marginal shelf in raised pond

Marginal shelf in raised pond

The edging for the lawn is now almost complete. As I expected, it had to be raised quite a bit above ground level at the back, but this was mainly because there was a big dip in that area. There will need to be a slight slope down towards the back fence, but nothing too dramatic. The main thing was to get the lawn flat as I don’t think it would have looked nearly as nice if it had been sloping.

In my final photograph, taken as the light was fading, you can see the shallow, ground-level pond has now been dug out. It’s difficult to see the depth from the photograph, but the deepest area is right next to the diagonal of the raised pond. There is a gentle slope from this flat, deep area, leading to the edge in all directions. Plants can be stood on the deepest area. Using Pythagoras, I was able to calculate that each of the three short sides needed to be 1.76 cm to make them all the same length. This worked on the ground as well as on paper. In this picture you may also be able to see that the soil from the shallow pond has been put to good use building up the ground level around the lawn edging.

The shallow pond has been dug out

The shallow pond has been dug out

Richard and Mike think that I should not dig over the lawn, because the rubble in it provides good drainage. Maybe that is true, but I may dig it over anyway because I don’t think it’s in very good health, whatever the reason. But for now I will put my tarpaulins over the soil and mow the existing grass as normal, because it’s more important to work on the rest of the garden first. I am already formulating a plan in my head, which I shall write in this blog, and then totally ignore, as usual.

\

Wednesday 19 January 2011

Day Two

Filed under: Progress — Helen @ 8:25 pm

This morning was a frosty one. It was -1.3C when I went to get the papers, and it took a while to get above freezing. Fortunately the concrete base was not bovvered. A layer of engineering bricks, which are unexciting apart from the fact that they have holes in them, was laid first. There is probably a really good reason for doing this. The tops of the bricks are level with the surface of the patio, so they won’t be seen when the earth is put back.

A row of engineering bricks to start the pond off

A row of engineering bricks to start the pond off

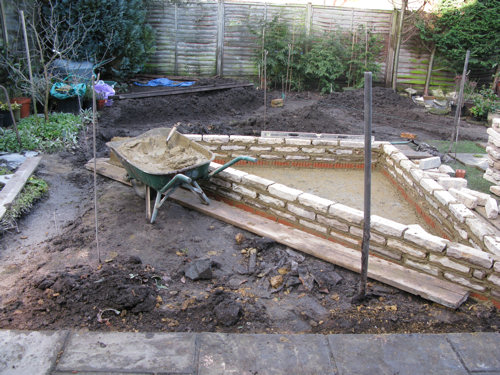
The walling blocks for the pond took a while to arrive. Kebur, our local supplier, was very busy today because the sun came out yesterday so lots of people wanted to do things to their gardens. This is what the pond looked like when it was about half built.

Three courses of the pond

Three courses of the pond

Meanwhile, the edging for the lawn has been progressing.

New patio edging and the start of the lawn edging

New patio edging and the start of the lawn edging

At the end of the day, Richard had laid six courses of bricks and Mike had got to the end of the right-hand long side of the lawn edging, but I couldn’t take any pictures because they wrapped it up in cloths and tarpaulins to keep it all nice and warm through the night. One of my blue tarpaulins came in useful because there was such a lot to cover.

Already I can see that the illusion is working. I am not sure how well it will work when looking out through a window, but when you come round the corner after walking down the side passage, you just have to look along the length of the lawn, and the garden really does look longer. Squaring off the edging of the patio really works well. Although I loved the curves, the straight lines look just right with all the rest of the design. I am beginning to think about how I will do the planting. There are bound to be too many plants for the space available, but I can put them in their pots in the places where I think they should go and see how that works. I can hardly wait.

\
« Previous PageNext Page »